Google’s recent update to the browser warns users when websites aren’t automatically protecting their communication.
Read MoreApple includes several ways to see and control the screen of another Mac over a network connection. Perhaps the easiest approach for those who don’t want to knock around in system settings is to use the Messages chat app. Both Macs involved in the remote assistance operation need Apple ID accounts and must be logged into the Messages app.
If you are the one providing the technical assistance, open Messages, select the name of the person you plan to help — or send a new message to start the conversation — and click the Details button in the upper-right corner of the window. Click the Screen Share icon, which looks like two overlapping rectangles, and select “Ask to share screen.” (If you’re the one needing the help, you can also reach out via a Messages buddy and use the “Invite to Share My Screen” option.)
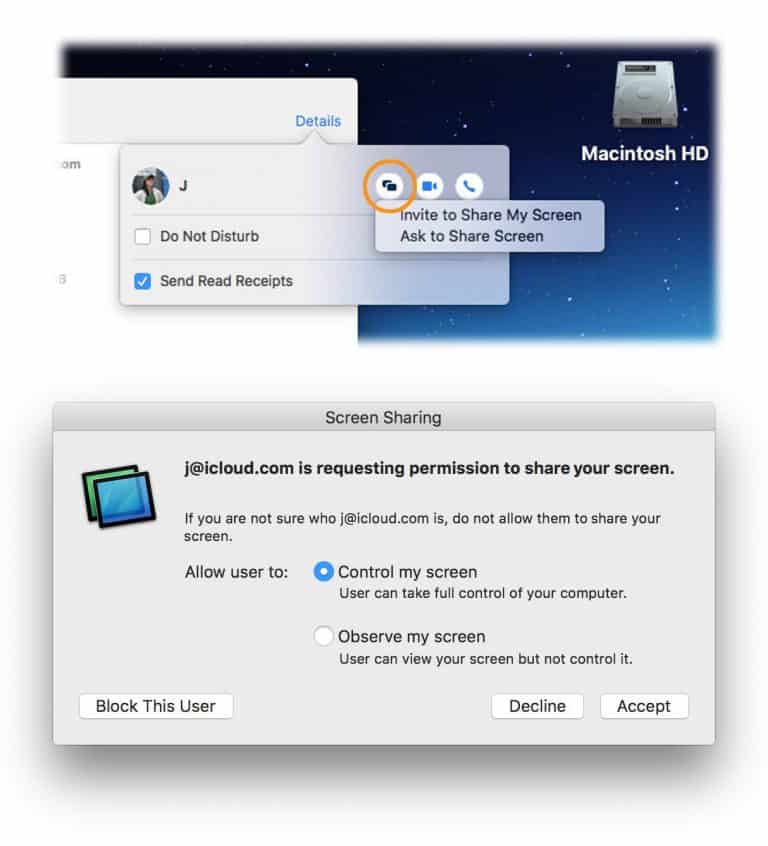
The person on the other end of the sharing request needs to accept your offer. A box pops up to ask that person to let you observe or take command of the screen. Once the person chooses “Control my screen” and clicks Accept, you should be able to take over that Mac with your own cursor and keyboard to provide remote technical support; the app also opens up an audio call between you and the other person so you can talk while you help. When you are finished, the recipient can close the session.
If the Messages app is not an option, Apple’s support site has detailed instructions for setting up the Mac for sharing in System Preferences and using alternative screen-sharing methods or iCloud’s Back to My Mac feature (until Back to My Mac is discontinued in the next version of the operating system). If you are remotely trying to configure settings on someone else’s Mac and you both have iOS devices, Apple’s FaceTimevideo chat app can be helpful for visual cues walking someone through setup steps; Microsoft Skype users can also share screens for visual reference.
Like Windows users, if you don’t care for the built-in tools, you can also use free third-party programs like TeamViewer to give and get remote assistance. Edovia’s $30 Screens 4 is another remote-control app and has a free trial version available.
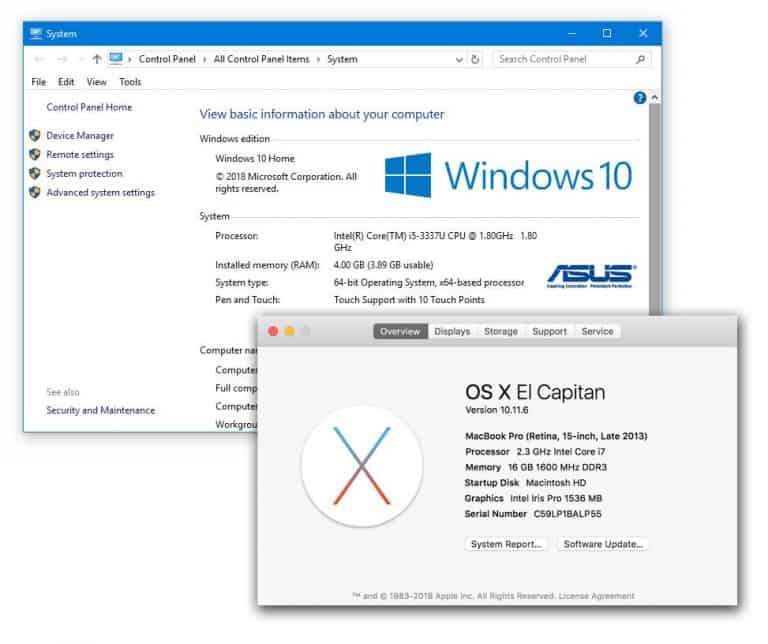
Before you start, make a list of your computer’s current components — like its hard drive type and capacity, the amount of memory installed and other system details — so you know what you’re starting with and to ensure any upgraded parts will be compatible. Your machine’s manual or system information box should have the configuration. You should also fully back up the data on your hard drive before tinkering around under the hood.
Adding random-access memory (RAM) should give the computer the ability to run more programs at once, browse the web faster and play games more smoothly. Before you buy, check with the manufacturer so you know the type and amount of RAM to install in your specific model. RAM makers like Corsair, Crucial and Kingston also have “memory finder” tools on their sites that help you match the right modules with your motherboard; prices vary by type and amount of memory.
If your computer uses a traditional hard drive, swapping it out for a solid-state drive is another way to increase the speed, as solid state drives have no moving parts and can read and write data faster. Solid-state drives are also not as expensive as they used to be — Wirecutter, a product review site owned by The Times, favors the Crucial MX500 and the Samsung 860 Evo, both 500-gigabyte drives for less than $130.
However, changing the computer’s hard drive also involves backing up all your data from the old drive and copying it onto the new one after reinstalling systems and applications. The iFixit site has a general guide to the hard-drive upgrade process, but it’s also a job a qualified computer repair shop can easily handle. If your computer can accommodate it, adding a larger or additional hard drive can also expand your system’s storage if things are getting tight.
Upgrading the computer’s main processor is often expensive and can require a new motherboard. But some systems make it easier, like those from AMD, which has an instructional video and a guide on its support site. If you like to play video games, upgrading the computer’s graphics card is another option for more speed and fluid display, as long as your model supports it.
Once you know what you want to do (and plan to do it yourself), buying the parts online usually saves money. You can find computer parts on specialty sites like Newegg or in more general stores like Amazon and Office Depot. For Mac users, Other World Computing has a handy My Upgrades page that lets you enter your model number, shows you all the components of the computer than can be upgraded, and sells you the parts right there.
Security Best Practices — Are You Implementing Them?
Chances are you’ve done it. You left your computer unlocked while you ran to the breakroom, or perhaps kept important documents exposed on your desk while you head out to lunch. This isn’t exactly uncommon, but it is a terrible habit to get into.
But wait — it gets worse!
According to Shred-It’s State of the Industry Report, 25% of workers have left their computers unlocked after leaving work for the day. That’s hours upon hours that the computer is accessible to anyone who happens to walk into that office. Now, let’s assume that this individual has admin rights. If someone wanted to, they could install malware on this device and spread it throughout the entire network. Or they could access confidential company data or employee/customer information stored on the device.
But this goes beyond locking the device. Like mentioned above, we’ve all likely left a document on our desk that should’ve been locked up before leaving our workspace. As it turns out, 36% of workers have left sensitive documents exposed after leaving work for the day. This too has a security breach written all over it. What if this was a medical facility? Think of all the information held in a patient file that is being haphazardly left on the admissions desk or an unlocked doctor’s office. I’m sure if it was your patient file, you’d be less than thrilled.
Preventing Human Error
Honestly, very few things are more difficult than preventing human error. You cannot control how others keep their workstations. You cannot control whether or not they lock their computer, or put sensitive documents away. So, what exactly can you do? First, you can mandate all devices that have no recognized activity for 2-4 minutes to automatically go into “Sleep Mode”, which you can require a password to unlock.
Unfortunately, you cannot magically make the file go into a locked cabinet after someone left it out. Nor is it feasible to do walk-throughs of employee offices before leaving for the day. Therefore, it may be most beneficial for management to put into place a write-up policy for exposed sensitive documents. If an employee is written up a certain amount of times, it is justification for termination of employment.
To be clear, these are not the only two risks. Employees who have passwords written down on sticky notes on their monitors, or saved in Word documents are equally guilty. Employers are suggested to invest in password vaults for employees, which will avoid the need to keep passwords elsewhere.
Conclusion
We get it — it can be easy to forget to do these things. It can also be hard to remember every single password you need to login to various programs, applications, or systems. However, as an employee of any organization, you are held responsible for the data you encounter on a daily basis. That information may include proprietary information for the company, customer/employee personally identifiable information, other company’s data, financial information, etc. Treat this information with respect and get in the habit of checking your workstation each time you exit it. This includes ensuring your devices are locked, and all sensitive data is removed from your desk and locked away in its proper place.
You’re also encouraged to take these best practices home. Locking your home devices and securing personal information so not every person that walks into your house can access it — is strongly encouraged.
The most recent version of Microsoft’s operating system can track your actions on the computer so you can return to past tasks — if you allow it.
The Timeline feature included with the Windows 10 April 2018 Update is meant to enhance your productivity by storing a record of the files you used, sites you browsed and other actions you made on your computer. Can’t remember where you stored a document or want to return to a particular website quickly? You can click the Timeline icon in the Windows 10 task bar to see a visual log organized by date, and jump back to what you need by clicking the appropriate preview icon.
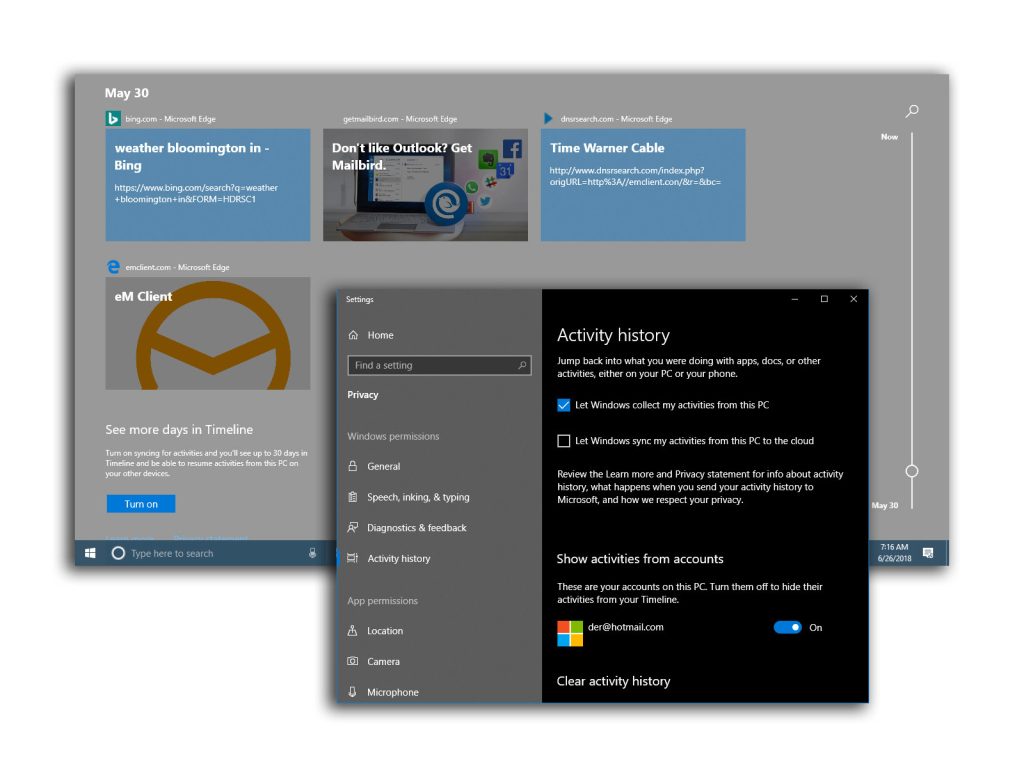
If Timeline is enabled, some of your PC activity — like files you edit in Microsoft Office — can also sync with your mobile device or another computer you use. And the tool works with the Cortana virtual assistant and its “pick up where you left off” function, which restores your work space on command.
The activity data is recorded based on the Microsoft account, so if you share both the computer and the same user account, the Timeline records are visible to all involved. To keep your travels private, create a separate account for one of you to use. If you’d generally like to keep your activity private and do not want Windows 10 tracking it, you can turn off the Timeline feature, hide it or edit it.
Press the Windows and I keys to open the Settings box (or click the gear-shaped Settings icon in the Start Menu) and select the Privacy icon. On the left side of the Privacy box, select Activity History and turn off the box next to “Let Windows collect my activities from this PC” on the right side. If your computer was set to sync your activities with other devices online, also disable “Let Windows sync my activities from this PC to the cloud.”
If you eventually get separate accounts on the computer and one of you wants to use the Timeline feature, enable the data collection option in the Activity History controls again. In the “Show activities from accounts” area of the Settings box, flip on the switch next to the account wishing to use Timeline. Within the Activity History settings box, you can also wipe your activity history. To remove activities directly from the Timeline screen, right-click the thumbnail preview and choose the Remove or Clear option.
For those who find the feature useful and wish to use it, pressing the Windows and Tab keys opens the Timeline from the keyboard. You can also open Timeline by clicking its Taskbar icon next to the Cortana search box. Don’t see the Timeline icon? Right-click the Taskbar and choose “Show Task View Button.”
The time-honored travelers’ trick of charging your phone from the USB port on the hotel-room television is one option for powering up away from home.
Many television models have included USB jacks for years, particularly the flat-panel type with plenty of multimedia ports on the back or side of the set. Depending on the TV, the USB jack is there for different purposes. On some sets, it functions as a service port for television technicians. On some TVs, you can also plug in a USB drive full of photos to view on the big screen.
In addition to transferring data between devices, the USB standard can supply a small amount of power to gadgets connected with a USB cable. Phone manufacturers recommend that you charge your phone’s battery with the cable and electrical adapter that came with the device, and you use other options at your own risk. However, travelers who remembered their phone’s USB cables but forgot their wall charger cubes have been tapping power from functioning television USB ports for years.
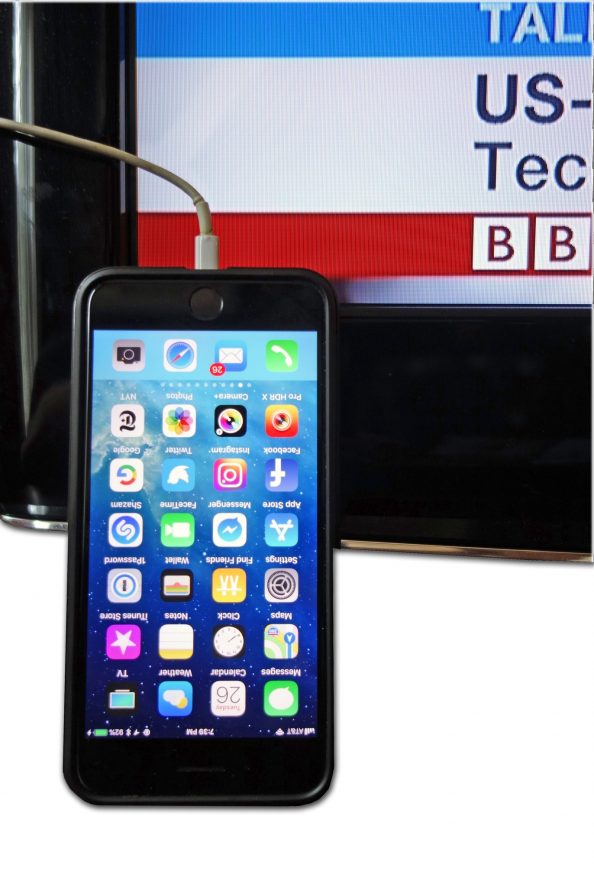
The phone’s battery might not charge as quickly as it does with your standard power adapter or wireless mat, and the television may have to be on. But the TV’s USB port can do in a pinch if you have no other options and the hotel’s front desk does not have a charger to lend you.
If you have the right cable, you can also charge your phone from a computer’s USB port. Some hotels include USB ports in the rooms, although some security experts have advised against plugging a USB cable directly into a public USB jack because of the slim chance of data theft or malware. Likewise, the Federal Trade Commission has previously warned travelers about directly connecting phones to the USB jacks for the infotainment systems in rental cars because the phone could share personal data with the car’s system, but a dedicated charging port is another option.
Just keeping a spare travel charger permanently tucked in your suitcase can keep you powered on the road if you forget your usual gear. Wirecutter, a product review site owned by The New York Times, has recommendations for USB chargers for both walls and cars.
Apple includes a few tools with macOS to help manage unnecessary files on your computer.

For years, Mac computers did not come with utilities like Disk Cleanup and the newer Storage Sense found in Windows, but Apple added new tools in 2016 with the release of its macOS Sierra system. If your Mac is running at least that version of the system, go to the Apple Menu, select About This Mac and click the Storage tab.
On the Storage screen, you should see a graphic showing your drive’s available space. Click the Manage button on the right side of the box to get started. The resulting storage-management screen offers four ways to clear off old files: Store in iCloud, Optimize Storage, Empty Trash Automatically and Reduce Clutter.
As one might expect, the Store in iCloud option punts documents, photosand Messages off your Mac’s drive and into your iCloud online storage locker. While this does free up room on the computer, you may have to buy more iCloud storage space from Apple if you fill up your five gigabytes that come free with an iCloud account.
Enabling the Optimize Storage feature dumps iTunes videos you have already watched, but you can download them again later. The setting also changes the Mail program’s behavior regarding file attachments to retrieve only recent files — or only those that came with messages you have opened.
The Empty Trash Automatically setting permanently deletes files that have been living in the Mac’s trash for longer than 30 days. (In macOS Sierra and later, the system also automatically dumps duplicate Safari downloads, cache files, logs and other unneeded files.)
Using the Reduce Clutter feature is another way to find big files hogging drive space and remove them. To see what the Mac considers “clutter,” click the Review Files button and go through the lists of files deemed large, old or unnecessary. Click the X next to each file to delete it.
If you are running a version of the operating system older than macOS Sierra, you can manually wade through your drive tossing old files or get a third-party cleaning app to sweep up for you. The Macworld site has a detailed list of cleaning tips that explains how to find and trash old Mail downloads, cache files and disk images.
If you’d rather have software do the job, a combination of MacPaw’s CleanMyMac 3 and Gemini 2 (for system cleaning and duplicate-file removal) is an option; free trials of the programs are available. Disk Cleanup Pro and Dr. Cleaner are among the free utilities in the Mac App Store, and others can be found online. As with all maintenance programs, however, read the reviews before you download and back up your Mac before using software intended to automatically delete files on your computer — just in case.
Start by opening the Contacts app on your Android device and selecting the contact you’d like to dress up with a photo. Tap the pencil-shaped Edit icon in the lower-right corner; if you have multiple accounts on the device, you may be asked to pick one here.
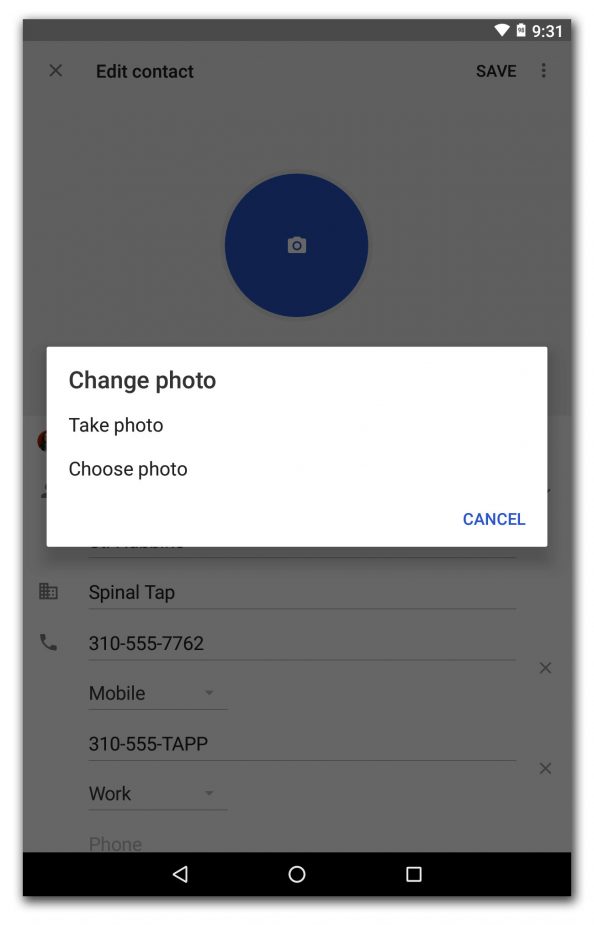
On the Edit screen for the person’s card, you can edit the name, the address, the phone number and other information by selecting the corresponding text field. To add a photo, tap the camera icon in the center of the circle at the top of the card. In the box that appears, you get the option to take a new picture right there or to choose a photo from the albums on your Android device.
Once you select a photo, you can resize and crop the image to your liking. Once you have finished editing the card, tap the Save button in the upper-right corner.
If you are using your Google Account’s default sync settings, the edited contact card updates itself across all the devices connected to the same account, including the Google Contacts app for desktop web browsers. Likewise, if you have more photos of people on your computer, you can add those pictures to your contacts by following the same editing steps through the Google Contacts app in the web browser and then syncing them to the Android device.
The process is similar for those with Apple devices wishing to add pictures to iOS, macOS and iCloud Contacts. When you have edited the contacts, added a photo and saved the card, the updated version should be available on all the devices using the same iCloud account.
After retiring Picasa from further development in 2016, Google announced in March that the desktop photo-editing program would no longer work to upload or download photos, or manage online albums. Similar programs do exist, but they may not have quite the same suite of editing tools and easy online album-sharing capabilities as the free Picasa software. To help narrow your options, make a list of the features you used the most and then try to find a replacement that matches up best with the Picasa toolbox.
Google Photos — the service that replaced Picasa in the company’s free software lineup — might be the easiest move for your files, as your Picasa Web Albums are most likely there already thanks to Google’s transition from the old program to the new one. You just need to log in at photos.google.com with the same Google Account name and password you used for Picasa. Google Photos can back up pictures on your computer to server space online, and you can order printed books of your pictures online. Still, some may find the photo-editing tools more limited than those offered in Picasa.

If “free” is the right price for you, but you want more editing and retouching controls, the photo programs made by Apple and Microsoft may suffice. In addition to cropping and color-adjustment tools, Photos for the Mac and Microsoft Photos for Windows 10 can fix the red-eye look caused by a camera flash, organize pictures with tags, share online albums and smooth over imperfections within the image.
The cross-platform, open-source GIMP (GNU Image Manipulation Program) software is another versatile photo-editing program, but might be a little more technical than some entry-level applications. If it piques your interest, GIMP has an online user manual you can browse before downloading.
The Flickr picture-sharing site, recently acquired by SmugMug, offers photo editing tools, a terabyte of free storage space and a service to print photo books.
For those who want robust editing and album-management features and don’t mind paying, ADSee Photo Studio (versions starting at $60) and Adobe Photoshop Elements ($100) are two programs to consider. Each has a free trial to download so you can sample the software before buying it. Although the learning curve can be steep, Adobe’s Creative Cloud Photography plan includes the industry-standard Adobe Photoshop CC and Adobe Lightroom CC for $10 a month.
Not all photo-editing programs include the ability to directly order prints online. When you need physical copies of your pictures to share, you can export the edited images from your photo program and upload them to the website of an online printing service like Adorama Pix, Nations Photo Lab, Shutterfly or Snapfish. Some drugstore sites (CVS, Walgreens and so on), also offer online photo ordering, and some pharmacies have photo printers in the store you can use to print out flash drives full of pictures.
The iCloud service — used to store files on remote servers and keep data in sync among Macs, Windows computers and iOS devices — is integrated into Apple’s operating systems. However, iCloud includes only five gigabytes of free storage before Apple charges for more space.
In the United States, prices for more iCloud storage space start at 99 cents a month for 50 gigabytes. (Music and video purchases you make from the iTunes Store are also stored in your iCloud account so you can download them again, but are not counted against your iCloud space allowance.)
As Apple notes on its support page about managing your iCloud space, “If you run out of iCloud storage, your device won’t back up to iCloud, new photos and videos won’t upload to iCloud Photo Library, and iCloud Drive, other iCloud apps and your text messages won’t stay up to date across your devices. And you can’t send or receive emails with your iCloud email address.”
Deleting old mail and file attachments, photos and videos you no longer need, and outdated files from your iCloud drive can help reclaim some of that space. For those with a large-capacity iPad or iPhone that is consuming a lot of iCloud space with backups, you can switch your device backup to iTunes on your Mac or PC.
When looking for an alternative service, first figure out how you are currently consuming your available iCloud space. If you are using iCloud for everything — or just for things like iCloud mail, photos and iWork documents — you will need to find services that can replicate those storage functions.
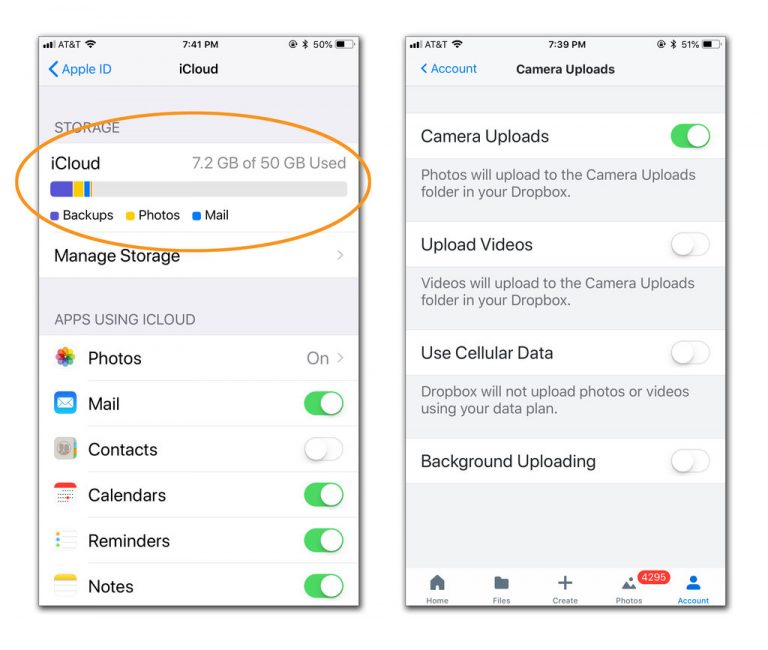
Many online backup services have their own iOS apps you can use to get to your stored files from an iPhone or an iPad as well as a desktop computer. If you need to use your stored files on a mobile device, make sure the service you select has a companion app. (Also, keep in mind that if you need a large amount of storage space, you will likely need pay for it, just as you would for additional iCloud storage.)
Several options have their own iOS apps, automatic photo backup and free starter accounts. These include Google Drive, which gives you 15 gigabytes of space to share among Google Photos backup, Gmail and file storage. If you do not care for Google, free Dropbox accounts start with two gigabytes of storage space and free accounts from Box and MediaFirestart with 10 gigabytes of storage.
Microsoft’s basic OneDrive service provides five gigabytes of free storage unless you have additional space that came with an Office 365 account. The Amazon Drive service offers five gigabytes free, and Amazon Prime members get unlimited photo storage.
Once you decide on a new online storage locker, download your documents, photos and other files you have backed up on iCloud, and then upload them to your new service.

